The Tickets feature provides a single interface wherein you can use the OpsQL query language to search for all types of tickets, like service request, incident, change request, and act on them accordingly.
With Tickets, you can do the following:
Build queries using OpsQL and perform various actions like save and search the views.
View a summary of the specific ticket in the slide-out for quick reference.
Navigation
To navigate to the Tickets listing page:
Log in to the OpsRamp portal.
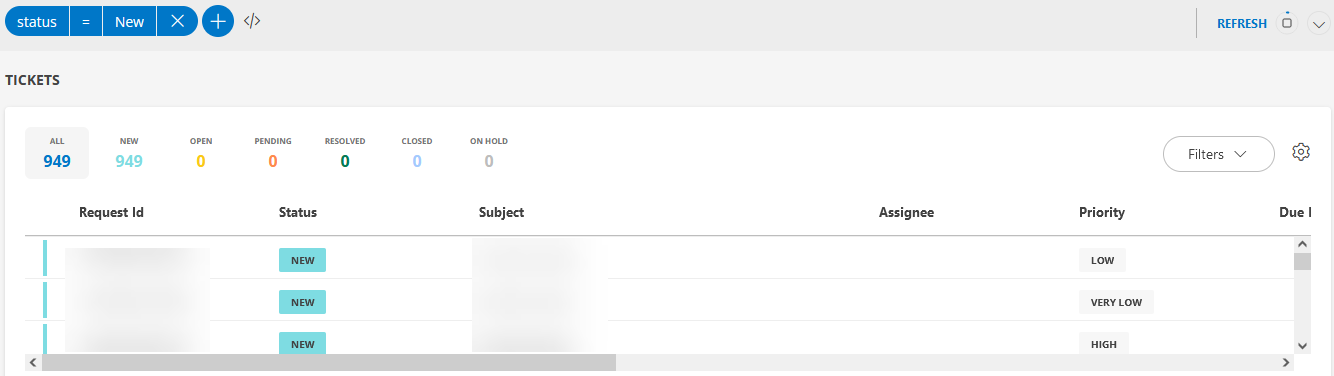
Go to Command Center > Tickets from the top menu. The Tickets listing page is displayed.
Tickets Column Settings
You can add or remove a column in the Tickets listing page.
Follow these steps to add or remove a column:
Click the Settings icon on the Tickets listing page.
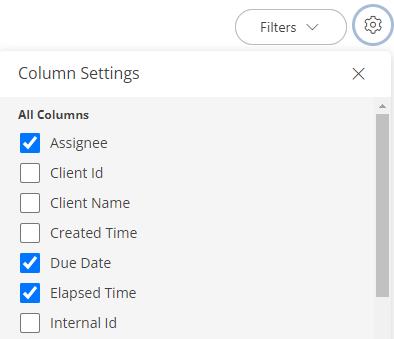
Select a check box to add a column. Clear a check box to remove a column.
Click Update. The Tickets listing page is updated accordingly.
Ticket Slide-Out
You can view the summary of a ticket on the ticket slide-out.
To view the ticket slide-out:
- Click the ticket Id on the tickets listing page.
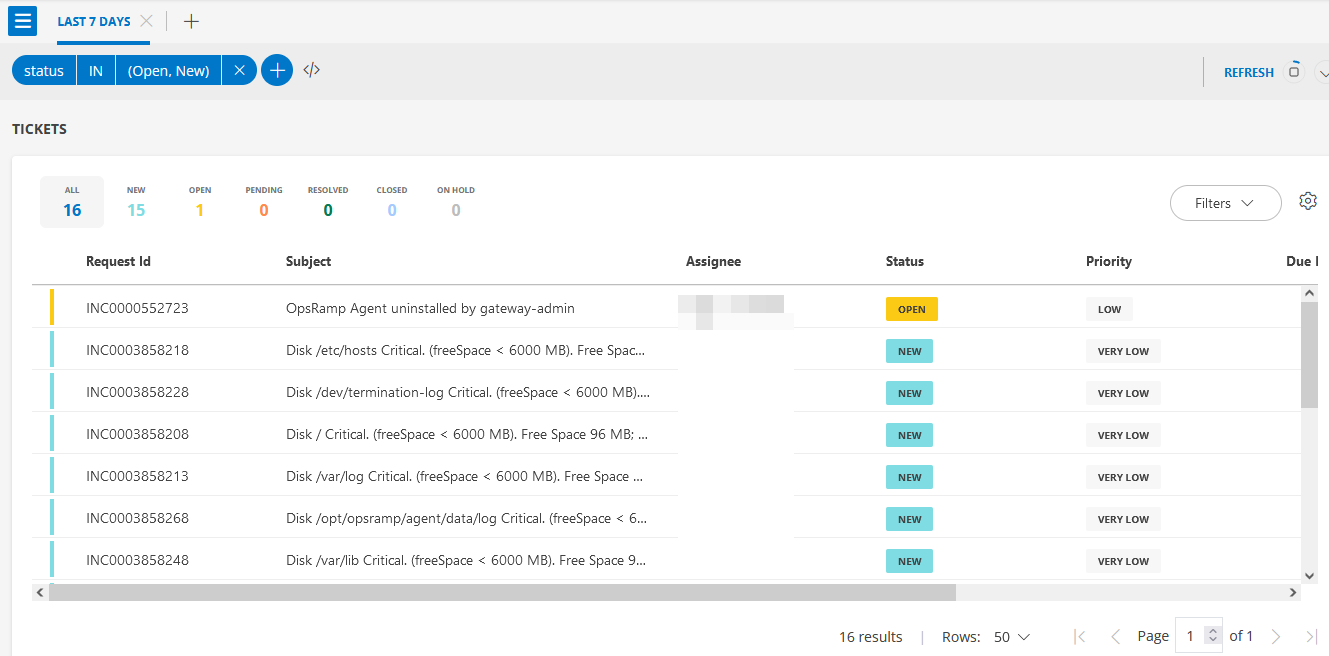
By default, the open and new tickets for the last seven days are displayed.
To learn how to build queries, click here.
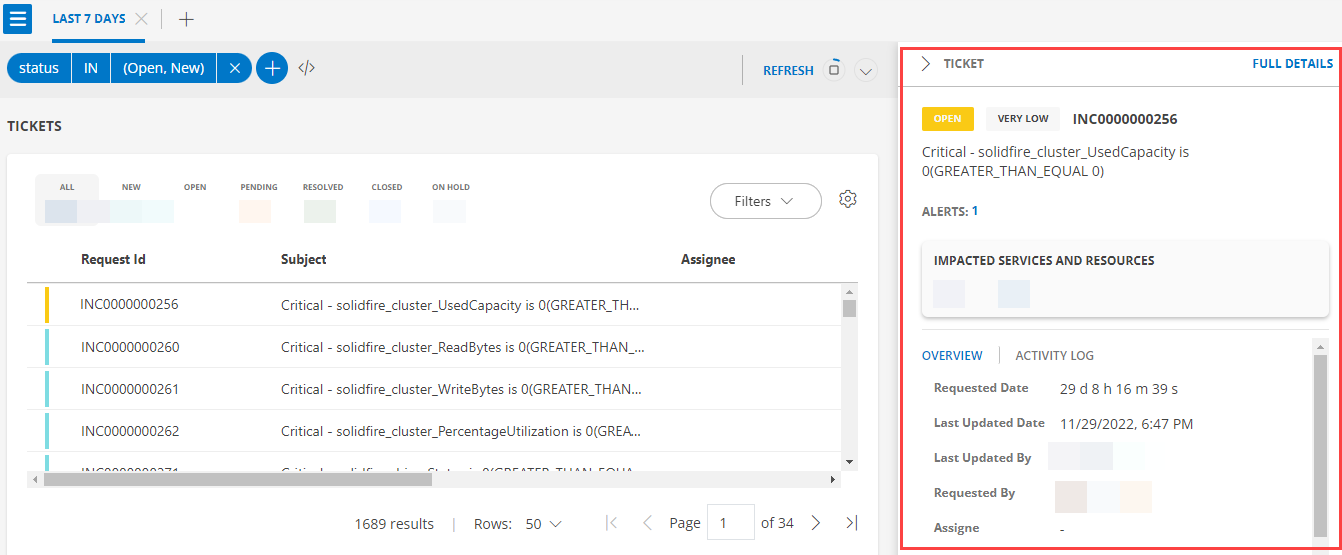
The ticket slide-out has the following information:
- The current ticket status and ticket priority information is displayed along with the ticket subject.
- The alerts count is displayed for the tickets created from the alert escalation policy.
Note: Based on the ticket type, the information is displayed in the slide-out. - IMPACTED SERVICES AND RESOURCES: All the impacted services and resources are displayed.
- OVERVIEW: The Overview tab has information like Requested Date, Last Updated Date, Last Updated By, Requested By, Assignee, Due Date.
- ACTIVITY LOG: Information related to the Activity log of the ticket.
- FULL DETAILS: Click the link to view the ticket details.
Following are the statuses of a ticket:- New
- On Hold
- Open
- Resolved
- Pending
- Reopen
How to build queries
Build queries using the basic and advanced query modes. The query modes have attributes, logical operators, and values that are dynamically populated. Select these parameters to form valid expressions and complete building the queries.
The following sections describe the steps that both the basic and advanced users should follow for building the queries:
Basic users - See for Basic Users section.
Power users - See for Power Users section.
Note: The basic and the advanced query modes are available in the Alerts and the Resource search pages in the platform.
For Basic Users
A beginner can start querying using the Basic Query mode. The Basic Query mode allows you to create a query without knowing the exact syntax.
By default, all the new and open tickets are displayed on the Tickets page. To clear the query, click the close X icon.
Click +QUERY. The ATTRIBUTES list is populated.
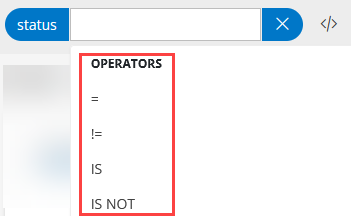
Select an attribute and then select an operator from the OPERATORS drop-down that is dynamically populated.
Select a value from the VALUES drop-down. The values are populated based on the selected attribute and operator. The query result is displayed.
Click + to add another expression.
The AND logical operator is selected by default. Click and select the desired operator.
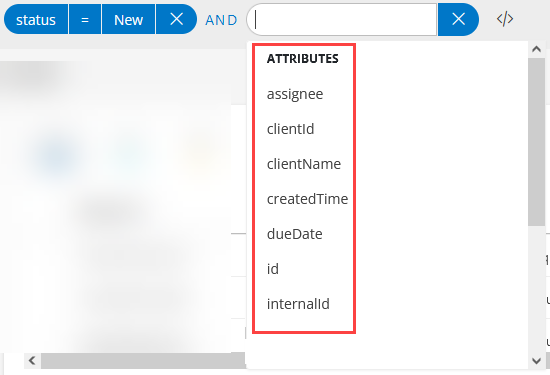
Follow the steps mentioned above to form another expression – attribute, operator and value.
The query result is displayed.
The following additional actions can be performed:
To create a new tab, click +.
To delete a query, click X.
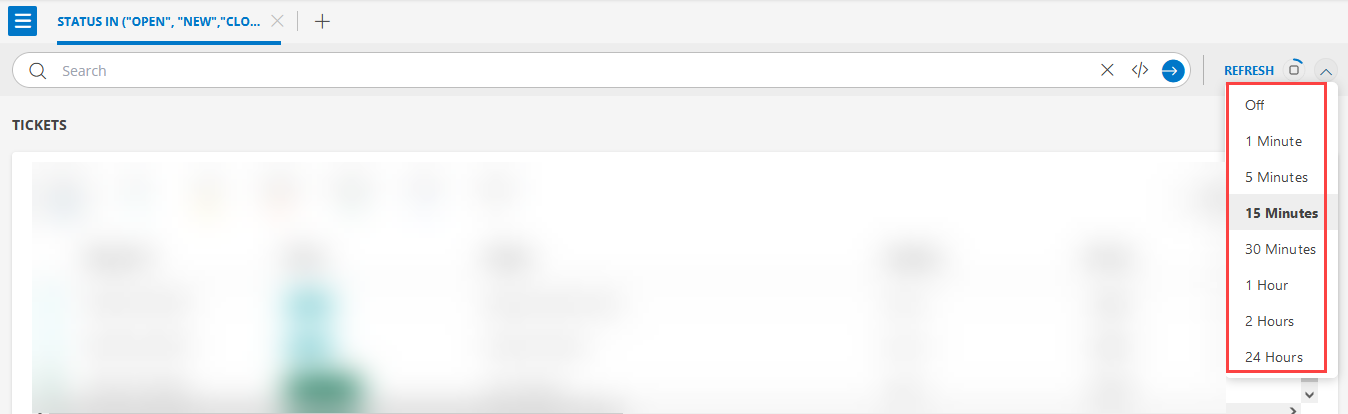
Click REFRESH to refresh the query result list. You can set the refresh duration from 1 Minute to 24 Hours. The default is set to 15 Minutes. Click Off if you do not want to refresh the query result list.
For Power Users
As a power user you can go ahead and use the Advance Query mode.
By default, all the new and open tickets are displayed on the Tickets page. To clear the query, click the close X icon.
Click the Advance Query mode icon to switch to the Advance query mode.
As soon as you start typing the attribute name in the Search box, the available attributes are displayed automatically.
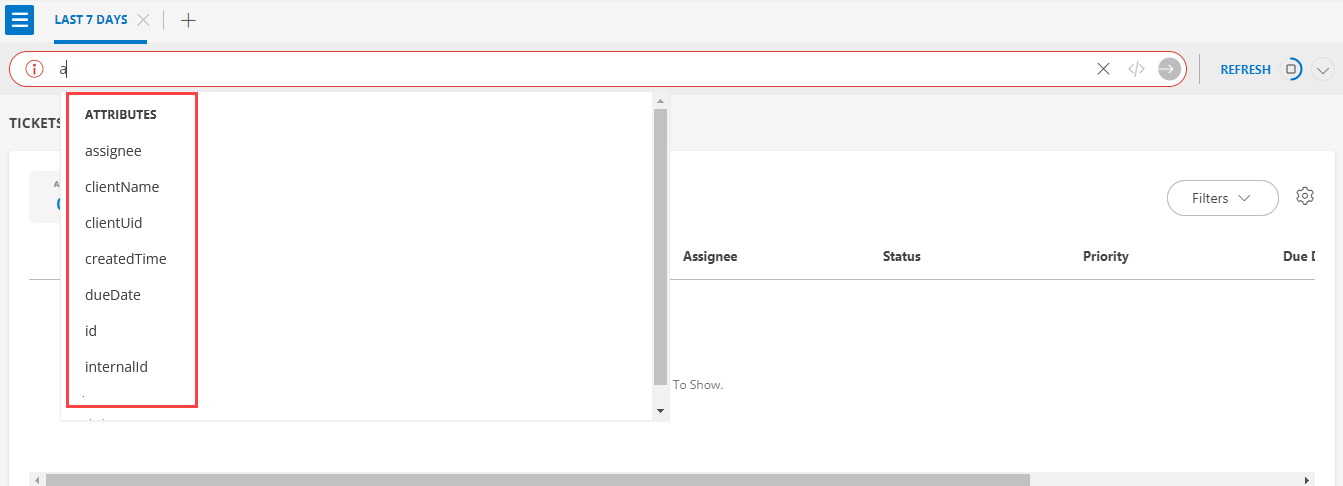
Select the attribute and the operator from the dynamically populated matching operator list and then type in (or select) a value.

Select the logical operators,
ANDorOR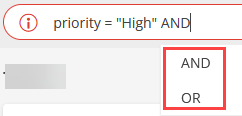
Follow the steps mentioned above – select the attribute, operator and value to form an expression. You can add as many valid expressions as possible.
Click the search icon or hit enter. The query result is displayed.
You can click the Basic Query mode icon to switch to the Basic Query mode.
Switch between Basic and Advanced Query modes at any time
- You can switch between the Basic and the Advanced Query modes anytime without making any changes to the query.
For more information on the OpsQL Query Language, syntax, attributes, operators, click here.
My Tickets Views
To navigate to the My Tickets Views slide-out:
Go to Setup > Route Incidents > Service Desk. The Tickets page is displayed.
Click the hamburger menu icon at the upper-left corner of the page, to view the My Tickets Views slide-out.
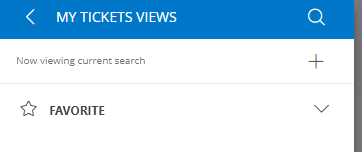
You can perform the following actions from the My Tickets Views slide-out:
Save a View
Once you execute a query, you can save the query results as a view.
To save a view:
Click the hamburger menu icon at the upper-left corner of the Tickets page.
From the slide-out, click the + icon. The SAVE VIEW popup is displayed.
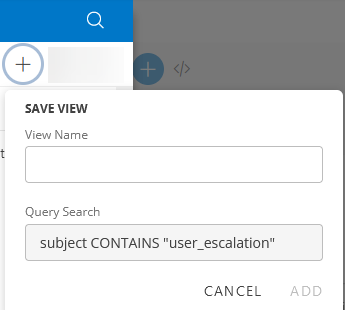
Enter a name for the view and click ADD.
The view is saved and displayed in the slide-out.
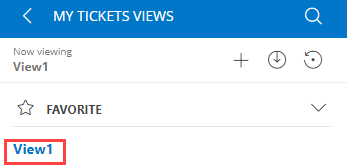
- Use the up/down arrow icons to hide/show the views in the slide-out.
- The Save and Restore icons appear after you create a view.
Set Favorite
To mark a view as favorite:
Search for the view using the search icon.
Hover over the view name on the slide-out.
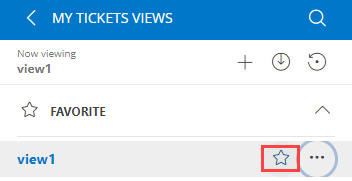
Click the star icon. The view is added as favorite and appears under the FAVORITE category. The blue colored star icon indicates that the view is added as favorite. If you want to unfavorite the view, click the blue colored star against the view. The view is removed from the Favorite category.
You can perform the following other actions on the saved view:
Restore
The Restore option reverts to the previous query.
Once you have made changes to a specific query, which is already saved as a view:
- Hover over the view name on the slide-out.
- Click the actions menu. The VIEW OPTIONS popup is displayed.
- Click the Restore option. The previous query automatically appears in the Search box.
Note: You must not save the changes you made to the query for the view. Otherwise, the query will not be reverted.
Rename
The Rename option allows you to rename the name of the view.
To rename a view:
- Hover over the view name on the slide-out.
- Click the actions menu. The VIEW OPTIONS popup is displayed.
- Click the Rename option. The RENAME VIEW popup is displayed.
- Enter a new name for the view in the Name box and click SAVE. The view is renamed.
Copy
The Copy option allows you to create a copy of a view.
To create a copy of a view:
- Hover over the view name on the slide-out.
- Click the actions menu. The VIEW OPTIONS popup is displayed.
- Click the Copy option. The COPY VIEW popup is displayed.
- Enter a name for the view in the Name box and click SAVE. The view is copied and is displayed in the slide-out.
Set Default View
The Set Default View option allows you to set a view as a default view for the current user.
To set a view as a default:
Hover over the view name on the slide-out.
Click the actions menu. The VIEW OPTIONS popup is displayed.
Click the Set Default View option. The Set Default View dialog box is displayed.
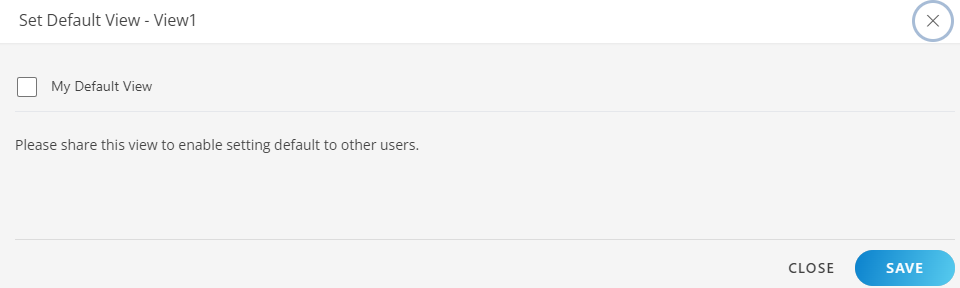
Select the My Default View check box.
Click SAVE.
Refresh the browser. You can see that the view is set as default for the current user.
To set the default view for other users, share the view and make it default for the user you want to set as default.
Share
The Share option allows you to share a view with other users.
To share a view:
Hover over the view name on the slide-out.
Click the actions menu. The VIEW OPTIONS popup is displayed.
Click the Share option. The Share View dialog box is displayed.
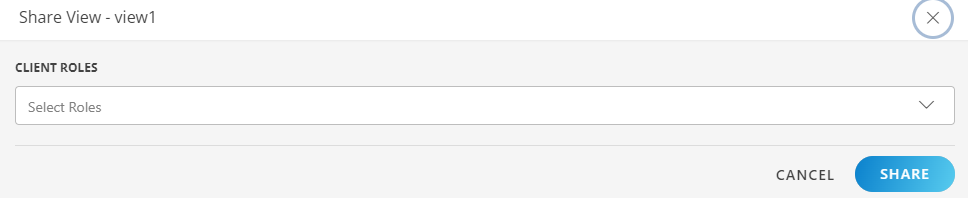
Select a role from the drop-down list.
Click SHARE. The view is shared.
Remove
The Remove option allows you to remove a view.
To remove a view:
- Hover over the view name on the slide-out.
- Click the actions menu. The VIEW OPTIONS popup is displayed.
- Click the Remove option. A confirmation dialog box is displayed.
- Click REMOVE. The view is removed.
Query Examples
| Query | Description |
|---|---|
| ticketType = "Incident" | Returns all the Incident tickets |
| subject CONTAINS "new task request" | Returns all the tickets which have "new task request" as part of the subject |
| status = "Closed" | Returns all the tickets that have status as "Closed" |
| requester = "client user" | Returns all the tickets which are requested by "client user" |
| priority IN ("High","Urgent") | Returns all the tickets with priority as "High" or "Urgent" |
| internalId >= "1234" | Returns all the tickets which have ticket Id >= "1234" |
| id ENDS WITH "123" AND ticketType = "Incident" | Returns all the incident tickets whose ID ends with "123" |
| dueDate >= "-2d" | Returns all the tickets whose due dates were within the last 2 days |
| clientName = "client-1" AND status = "Open" | Returns all the open tickets for "client-1" |
| clientUid CONTAINS "10d1" AND ticketType = "Incident" AND status = "New" | Returns all the new Incident tickets for clients whose clientUid contains "10d1" |
| createdTime > "-10d" AND priority = "High" | Returns all the High priority tickets created over the last 10 days |
| subject CONTAINS "business hours" AND ticketType = "ServiceRequest" | Returns all the service request tickets that have "business hours" as part of the subject |
| dueDate > "-5d" AND priority = "High" | Returns all the high priority tickets with due date within the last 5 days |