Overview
Simple Network Management Protocol (SNMP) is an application-layer protocol defined by the Internet Architecture Board (IAB) for exchanging management information between network devices. It is a part of the Transmission Control Protocol/Internet Protocol (TCP⁄IP) suite.
SNMP is one of the widely accepted protocols to manage and monitor network elements. Most of the professional-grade network elements come with bundled SNMP agent. These agents have to be enabled and configured to communicate with the network management system (NMS). The SNMP agent is a program that resides on your managed device, packaged within the network element. You have to enable it on your device. It collects the management information from the device locally and provides it to the SNMP manager. These agents could be standard, for example, Net-SNMP or specific to a vendor, such as HP Insight Agent.
SNMP Credentials
SNMP uses a password-like authorization known as a community string. When you provide an SNMP credential to a device, it checks to see if the community string matches the community string configured on the device. If the string matches, the device responds to the SNMP query.
Discover the gateway using SNMP
To find the read-only gateway community string, one option is to:
- Log into the gateway WebUI.
- Click SNMP.
Or, you can get the read-only community string by logging into the gateway and reading the string in the /etc/snmp/snmpd.conf file.
You can change the community string to a name of your choice.
Multi-credential functionality
SNMP multi-credential functionality allows you to discover network resources using multiple credentials using a single discovery profile. You can create or use multiple credential sets if you are using a gateway to discover your resources.
For example, a printer uses SNMPv2c credential type and a Cisco router uses SNMPv3 credential type. In such a case, you need to create two discovery profiles. With SNMP multi-credential functionality, you can create one discovery profile and use both the credential sets.
The gateway discovers devices with the credentials, sequentially, as the credentials were entered when a Discovery Profile was created at the time of the first scan. After successful discovery, the gateway remembers resources and their credentials for subsequent discovery.
Multi-credentialed, SNMP-enabled devices have the following advantages:
- Reduces the effort of creating multiple discovery profiles.
- Reduces time for manually traversing through multiple discovery profiles to discover a network resource.
- Scans and discovers a subnet with multiple SNMP community strings.
- Discovers network resources working on different SNMP versions.
SNMP field values
The following provides information on configuring the SNMP fields for creating an SNMP credential set.
SNMPv1 and SNMPv2
| Field | Value | Description |
|---|---|---|
| Port | 161 | Agent receives requests on UDP port 161. |
| Community | N/A | Read-only community string. |
SNMPv3
SNMPv3 is a user-based security model. It provides secure access to the devices by combining authenticating and encrypting packets over the network. The security features provided in SNMPv3 are message integrity, authentication, and encryption.
| Field | Value | Description |
|---|---|---|
| Port | 161 | SNMP Agent port. The default port is 161. |
| Context | N/A | Specify context name (an octet string) that identifies the collection of management information accessible by an SNMP entity. |
| Security Name | N/A | Enter the name of the user (principal) on whose behalf the message is being exchanged. |
| Security Level |
|
|
| Authentication Protocol |
| Authentication in an SNMPv3 uses an encryption algorithm to determine if the data is from a valid source. The encryption algorithms for authentication:
|
| Authentication Password | N/A | Enter the Authentication password. |
| Confirm Password | N/A | Re-enter authentication password for validation. |
| Privacy Protocol |
| Privacy in SNMPv3 uses an encryption algorithm to encode the contents of an SNMPv3 packet. This encoding is used to verify that the content cannot be viewed by unauthorized entities when routed over the network.
|
| Privacy Password | N/A | Enter the privacy password. |
| >Confirm Password | N/A | Re-enter authentication password for validation. |
| Connection time-out | N/A - Default value: 10,000 milliseconds | Provide a maximum time period for discovery. If the gateway does not get a response from the device after 10,000 milliseconds, it terminates the discovery. |
Note
Before starting the SNMP-based discovery, the gateway will check for the following ports: 22, 80, 135, 443, 3389, and 5900 on the remote resources to ensure that the resource is available for further discovery.Configure and Install an SNMP Integration
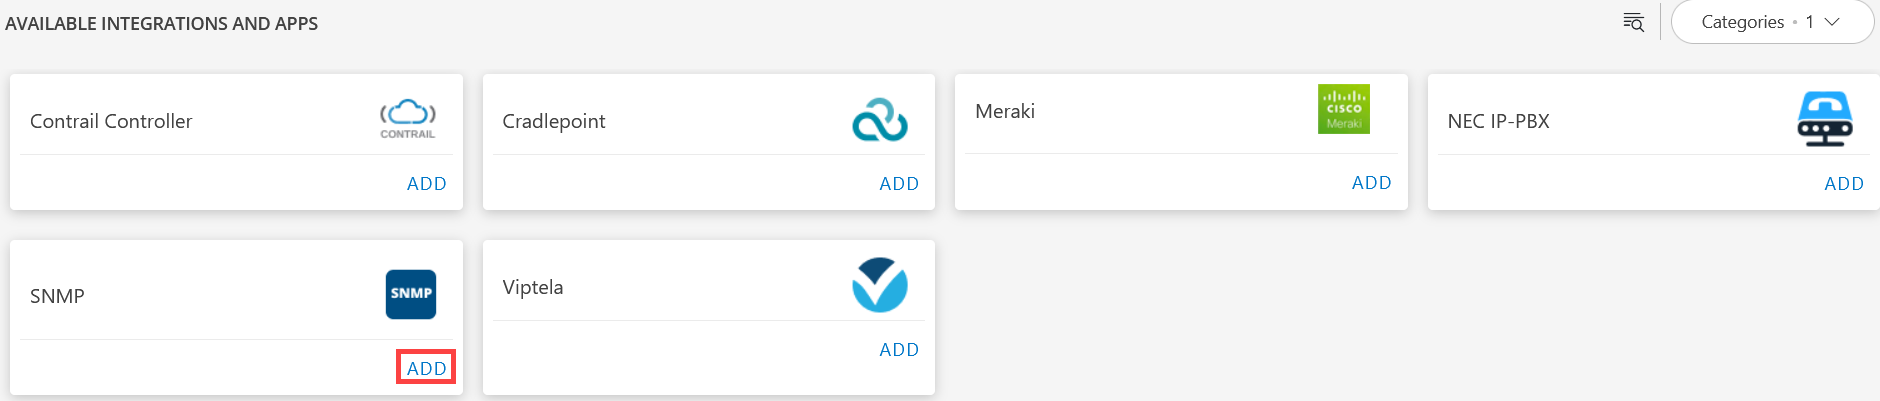
Go to Setup > Integrations and Apps.
Click + ADD on the INSTALLED APP page. The ADD APP page displays all the available applications along with the newly created application with the version.
Notes:- If there are already installed applications, it will redirect to the INSTALLED APPS page, where all the installed applications are displayed.
- If there are no installed applications, it will navigate to the ADD APP page.
- You can even search for the application using the search option available. Also you can use the All Categories option to search.
Click ADD in the SNMP application.
From the Configurations page, click + ADD.

The Add Configuration page appears.
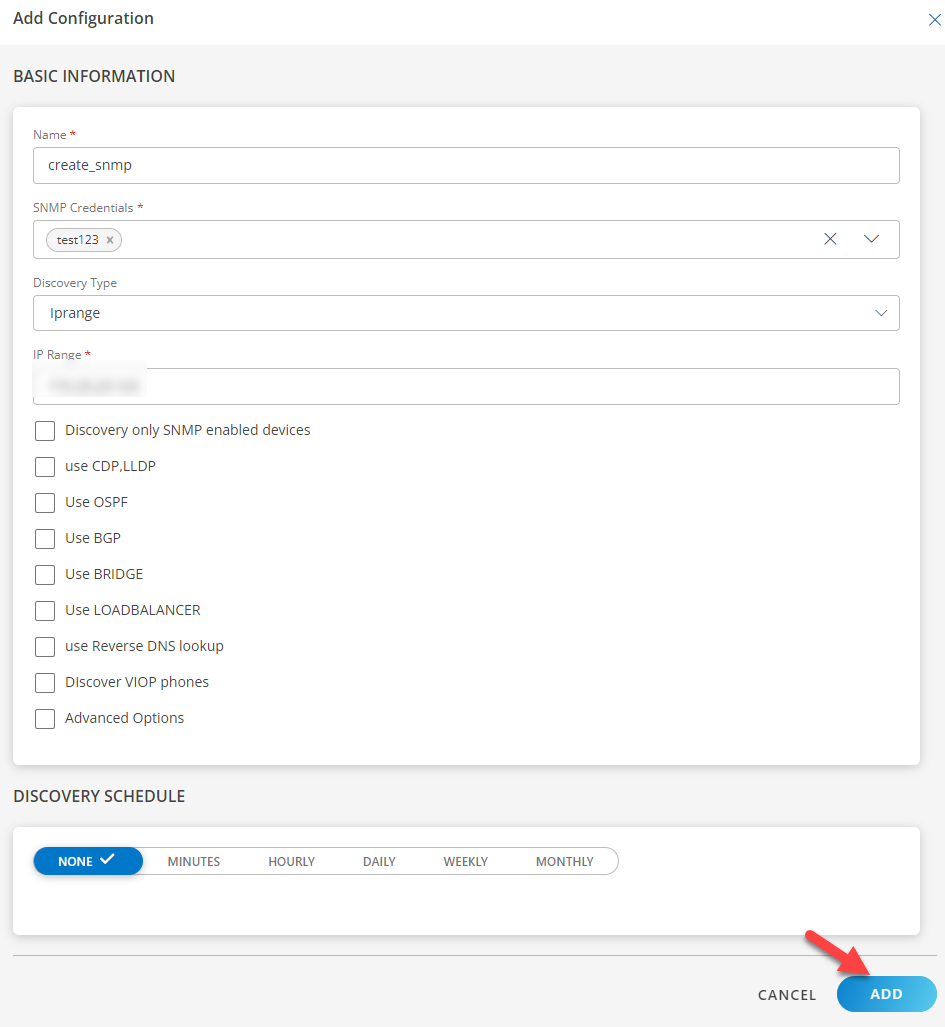
In the Add Configuration, enter the below details in the Basic Information section:
- Name: Enter the name for the integration.
- SNMP Credentials: Select the credentials from the drop-down list. Click + ADD to create a new credential.
- Discovery Type: Select the discovery type from the list: IP Range or Seed.
- IP Range: Provide the IP address.
Example: You can enter 172.25.23.123 as an IP range value.
In the Discovery Schedule section, select Recurrence Pattern to add one of the following patterns:
- None: Select this option, If you don’t want to schedule the discovery.
- Minutes: Select this option, If you want to apply the discovery on a minute basis. You can configure this option by choosing: Every minute.
- Hourly: Select this option, If you want to apply the discovery on hourly basis. You can configure this option by choosing: Every hour.
- Daily: Select this option, If you want to apply the discovery daily. You can configure this option by choosing: Every Weekday (Mon-Friday) or Everyday.
- Weekly: Select this option, If you want to apply the discovery on a weekly basis. Configure weekly schedule by selecting: Time preference, Starting date, and Days.
- Monthly: Select this option if you only want to apply discovery on a monthly basis. Configure this by selecting: Time preference, Starting date, and number of days in a month.
Click ADD.
Now the integration is saved and displayed on the configurations page after you save it. From the same page, you are able to Edit and Remove the created integration.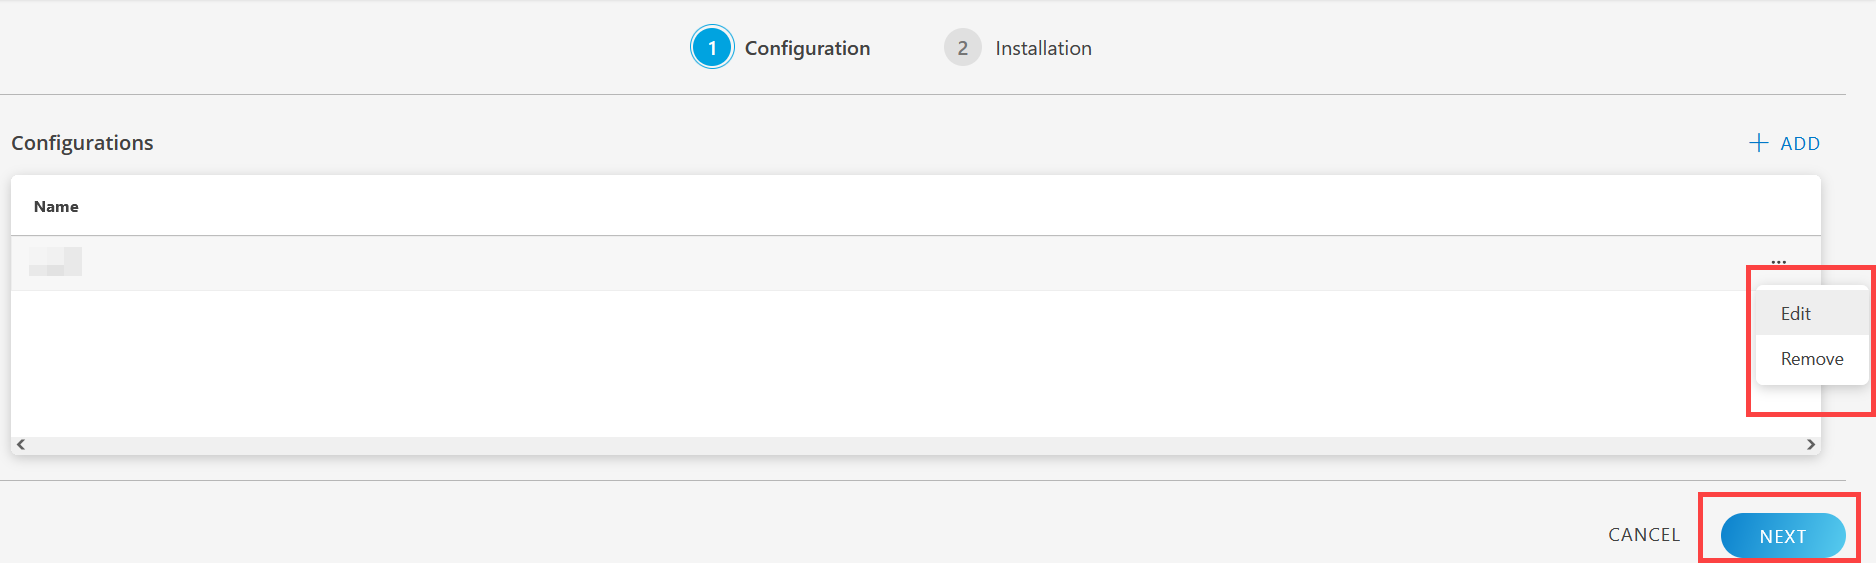
Click Next. The Installation page is displayed.
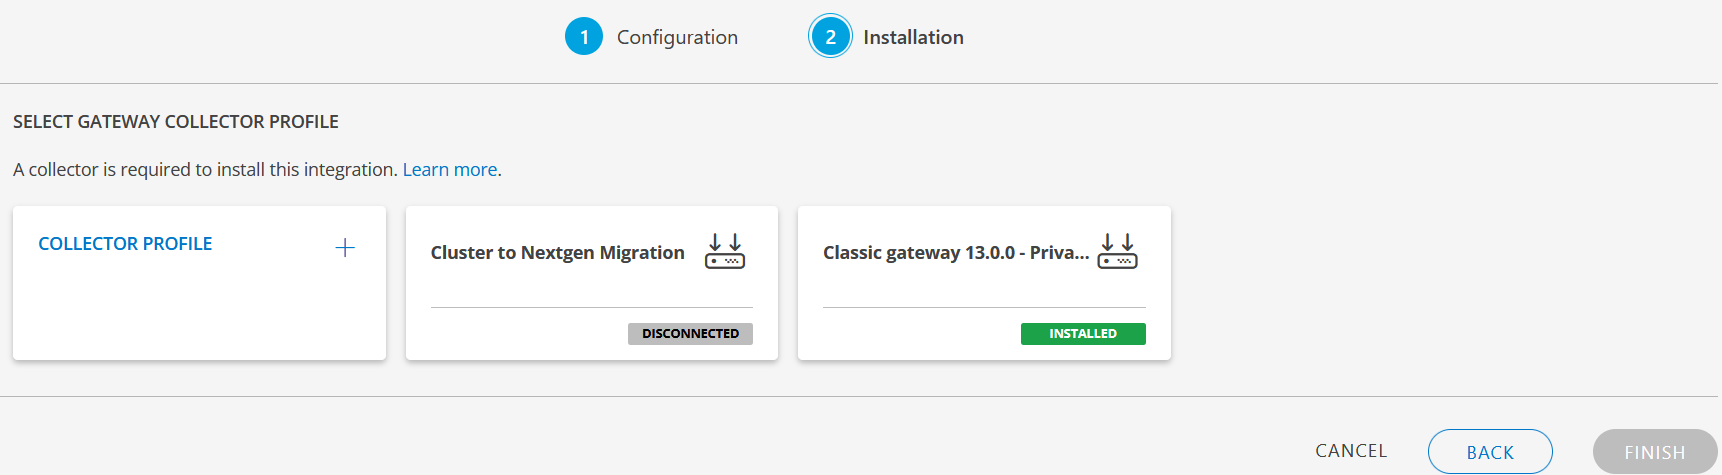
From the SELECT GATEWAY COLLECTOR PROFILE listing:
- Create a new collector by providing a new name or use the pre-populated name.
- Select a collector from the existing list.
Click Finish.
The integration or application is now installed and displayed on the Installed Integration page. Use the search field to find the installed application.
Modify an Installed Integration or App
- See Modify an Installed Integration or Application article.
Note: Select the SNMP application.