When an AWS account is created, you are signed-in as a root user (a single sign in entity) with unrestricted access to the subscribed AWS services, using an email and password unique to your organization. As a best practice, avoid using the root user account for basic tasks. Use Identity and Access Management (IAM) credentials to authorize OpsRamp to manage your resources.
Install the AWS integration on the OpsRamp console using Identity and Access Management (IAM) by granting access through AssumeRole with External ID. IAM is a web service that helps in securely controlling access to AWS services. For more information, see What is IAM?
External ID is a set of temporary security credentials to access AWS resources using the OpsRamp account. The External ID option aligns with AWS best practices that recommend not to share the static AWS credentials (Access ID and Secret Key) and also addresses the confused deputy problem.
With External ID with Identity and Access Management (IAM) you can permit a role to be assumed (Role ARN) only under specific circumstances. With External ID and Role ARN, you are assured that only OpsRamp assumes a predefined role and manages your resources. The External ID option automatically adds a condition to the trust policy that allows OpsRamp to assume the role only if the request includes the correct External ID. For more information, view How to use an External ID when granting access to your AWS services to a third party.
Workflow
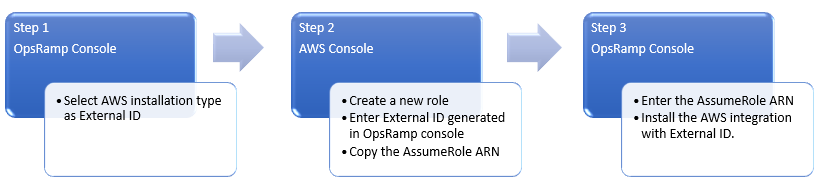
OpsRamp configuration
To install AWS integration with IAM AssumeRole and External ID credentials:
Get External ID from OpsRamp console.
Go to Setup > Integrations > Integrations.
Click All Clients and from the drop-down list, select a client.
From the Available Integrations page, click Public Cloud and click AWS.
Click Install.
On the Install AWS Integration page:
Name: Give a suitable name for the integration.
Region(s): Select the AWS region from the drop-down list. The services that belong to the selected region are onboarded.
You can select multiple regions to onboard the services. If you select two regions A and B, and if you are not authorized to access region B, onboarding fails for both regions A and B.
AWSType: Select External ID.
Your AWS account number and External ID are automatically populated. Copy the account number and External ID in a text editor such as Notepad. You need these details to create a role in the AWS console.
AssumeRole ARN:
The AssumeRole ARN is generated only after creating the role. To enter the ARN in this field, navigate to your AWS account and do the actions described in Step 2.
Do not close the the console window.
AWS configuration
Create AssumeARN Role in AWS Console.
- Log into your AWS management console.
- Navigate to IAM > Roles > Create Role.
The Create Role window opens. - Click Another AWS account from the options and enter your AWS Account ID.
- Select the option Require External ID and enter the External ID (copied from the OpsRamp console in Step 1).
- Click Next: Permissions.
- Click Create Policy.
- On the Create Policy page, click the JSON tab and paste the policy snippet given in the Appendix.
To learn more about permission policy, refer to Creating IAM Policies (console). - Click Review Policy and give a suitable name to the policy.
- Review the role and click Create role.
The details of the role created are displayed. - Copy the Role ARN at a safe location in a text editor such as Notepad.
OpsRamp configuration
Complete installing the AWS integration in the OpsRamp console.
After you get the credentials from the AWS console, navigate back to the already open OpsRamp console.
- Enter the Role ARN (copied from the AWS console) in the AssumeRole ARN field.
- Click Install. The AWS icon is displayed in the list of installed integrations with the details such as installed time, installed by, and enable status.
- Click the AWS icon. The AWS integration page opens and the credentials and discovery profiles are displayed.
Appendix: Example AWS access permission policy
Note
The permission policy will change with changes to OpsRamp-supported AWS services.{
"Version": "2012-10-17",
"Statement": [{
"Effect": "Allow",
"Resource": "*",
"Action": [
"autoscaling:Describe*",
"cloudtrail:Describe*",
"cloudtrail:Get*",
"cloudtrail:List*",
"cloudformation:Describe*",
"cloudformation:Get*",
"cloudformation:List*",
"cloudfront:Describe*",
"cloudfront:Get*",
"cloudfront:List*",
"cloudwatch:Describe*",
"cloudwatch:Get*",
"cloudwatch:List*",
"dynamodb:Describe*",
"dynamodb:Get*",
"dynamodb:List*",
"ec2:Describe*",
"ec2:Get*",
"elasticache:Describe*",
"elasticache:List*",
"elasticloadbalancing:Describe*",
"elasticmapreduce:Describe*",
"elasticmapreduce:Get*",
"elasticmapreduce:List*",
"iam:Describe*",
"iam:Get*",
"iam:List*",
"kinesis:Describe*",
"kinesis:Get*",
"kinesis:List*",
"route53:List*",
"route53:Get*",
"redshift:Describe*",
"redshift:List*",
"redshift:Get*",
"rds:Describe*",
"rds:List*",
"s3:Describe*",
"s3:List*",
"s3:Get*",
"sdb:List*",
"sdb:Get*",
"sns:List*",
"sns:Get*",
"sqs:Get*",
"sqs:List*",
"lambda:list*",
"lambda:get*",
"MachineLearning:describe*",
"MachineLearning:get*",
"StorageGateway:describe*",
"StorageGateway:list*",
"ApiGateway:get*",
"ecs:describe*",
"ecs:list*",
"workspaces:list*",
"workspaces:describe*",
"lightsail:get*",
"dms:Describe*",
"dms:List*",
"states:Describe*",
"states:Get*",
"states:List*",
"connect:Describe*",
"connect:Get*",
"connect:List*",
"mq:Describe*",
"mq:List*",
"appmesh:Describe*",
"appmesh:List*",
"appstream:Describe*",
"appstream:Get*",
"appstream:List*",
"appsync:Get*",
"appsync:List*",
"athena:Get*",
"athena:List*",
"gamelift:Describe*",
"gamelift:Get*",
"gamelift:List*",
"guardduty:Describe*",
"guardduty:Get*",
"guardduty:List*",
"glue:Get*",
"glue:List*",
"kms:Describe*",
"kms:Get*",
"kms:List*",
"lex:Describe*",
"lex:Get*",
"lex:List*",
"kafka:Describe*",
"kafka:Get*",
"kafka:List*",
"translate:Describe*",
"translate:Get*",
"translate:List*",
"cloudhsm:Describe*",
"cloudhsm:Get*",
"cloudhsm:List*",
"cloudsearch:Describe*",
"cloudsearch:List*",
"cognito-idp:Describe*",
"cognito-idp:Get*",
"cognito-idp:List*",
"codebuild:Describe*",
"codebuild:Get*",
"codebuild:List*",
"codecommit:Describe*",
"codecommit:Get*",
"codecommit:List*",
"codedeploy:Get*",
"codedeploy:List*",
"codepipeline:Get*",
"codepipeline:List*",
"directconnect:Describe*",
"directconnect:List*",
"elasticfilesystem:Describe*",
"elasticfilesystem:List*",
"elasticbeanstalk:Describe*",
"elasticbeanstalk:List*",
"es:Describe*",
"es:Get*",
"es:List*",
"elastictranscoder:List*",
"events:Describe*",
"events:List*",
"inspector:Describe*",
"inspector:Get*",
"inspector:List*",
"iot:Describe*",
"iot:Get*",
"iot:List*",
"mediaconnect:Describe*",
"mediaconnect:List*",
"mediaconvert:Describe*",
"mediaconvert:Get*",
"mediaconvert:List*",
"mediapackage:Describe*",
"mediapackage:List*",
"mediatailor:Get*",
"mediatailor:List*",
"opsworks:Describe*",
"opsworks:Get*",
"opsworks:List*",
"sagemaker:Describe*",
"sagemaker:Get*",
"sagemaker:List*",
"waf:Get*",
"waf:List*",
"waf-regional:Get*",
"waf-regional:List*",
"wafv2:Describe*",
"wafv2:Get*",
"wafv2:List*",
"swf:Describe*",
"swf:Get*",
"swf:List*"
]
}]
}